Calendaring Exploration Part 2
This is the second instalment of the Calendaring Adventures blog series that focuses on the deployment and use of a Zimbra instance to facilitate easier calendaring and scheduling. In this post, we detail how to setup Zimbra on an AWS instance.
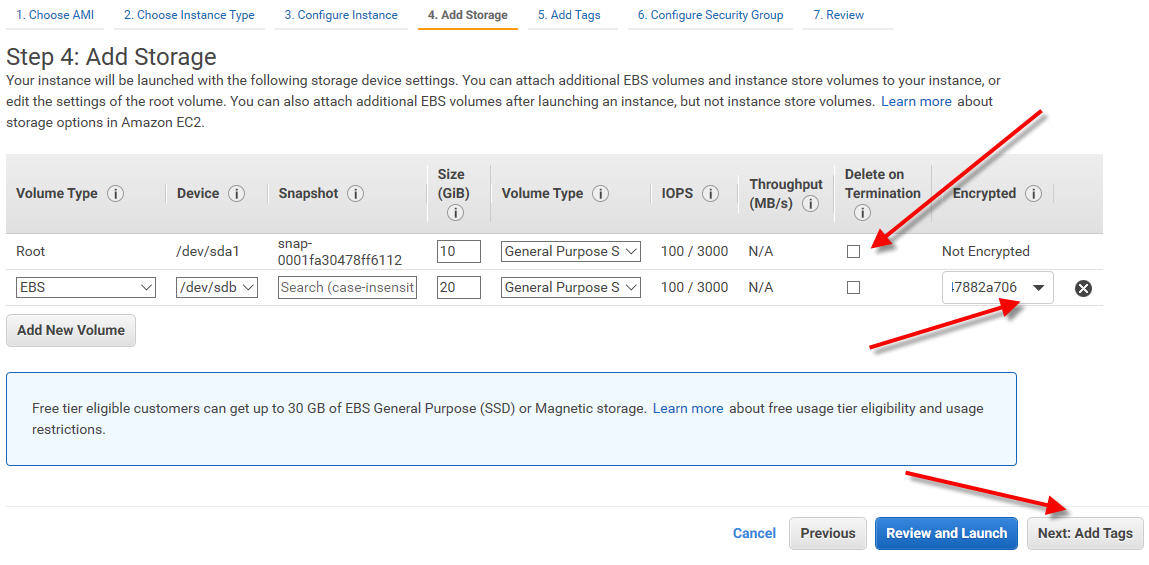
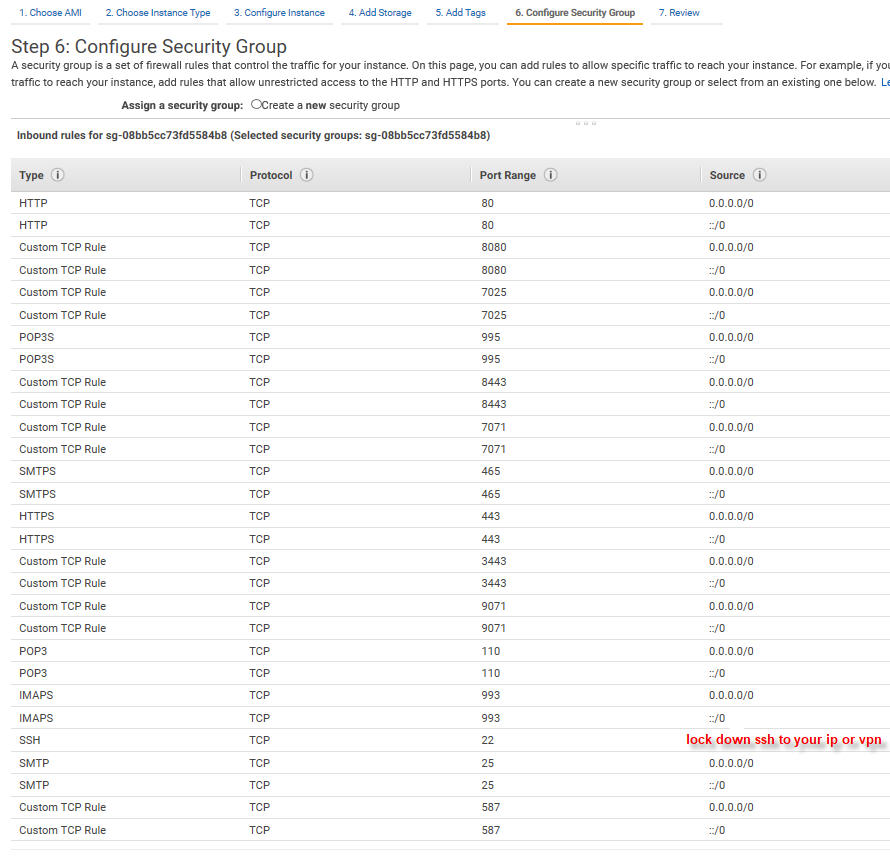
The following steps will guide you through setting up a Zimbra server on an AWS instance. We sized our Sandbox as a t2.medium instance, even though the minimum requirements are for 8GB of ram. For production systems, choose a t2.large instance. We created it using a root disk of 10GB and an encrypted 20GB disk for /opt. Disk space really depends on the volume of email in your organization. You will also need an elastic IP as well as MX records in DNS. Create a security group and add the ports needed for Zimbra.
AWS Walk Through
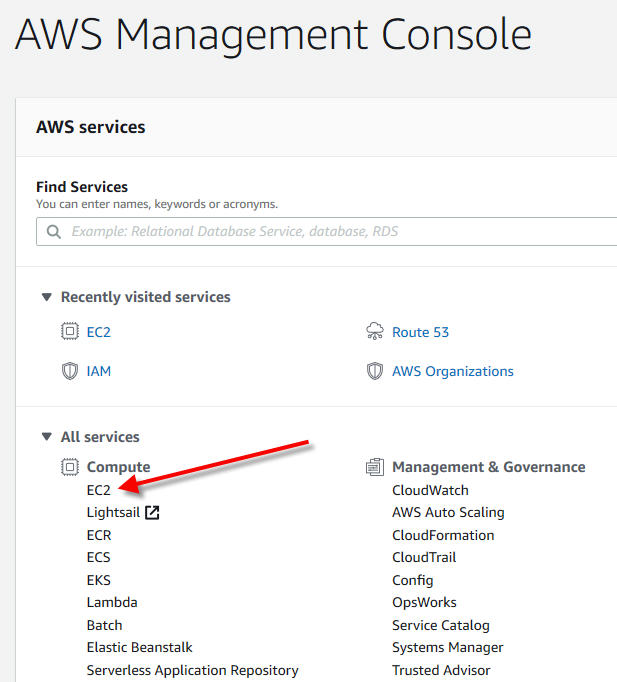
Here's a quick look at setting up an instance on AWS for Zimbra. From the AWS Management Console, navigate to EC2:
Launch an Instance:

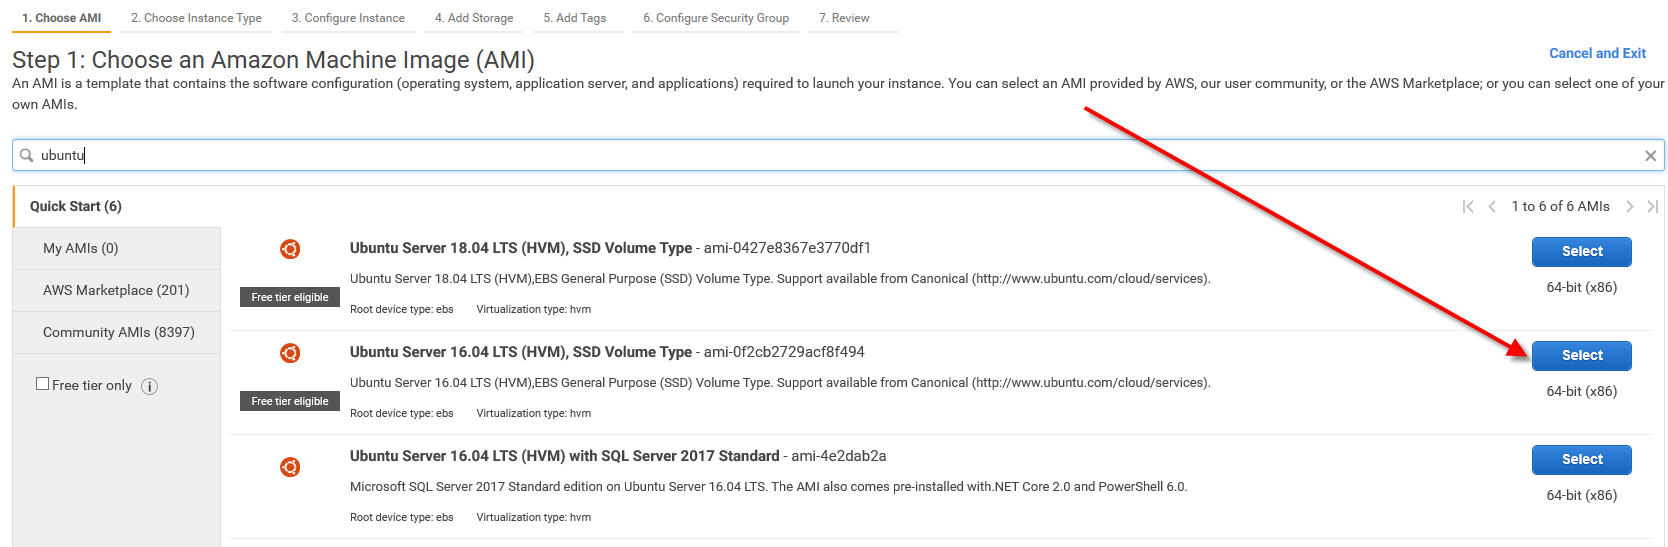
In the search box, search for Ubuntu, then select the 16.04 with SSD option:
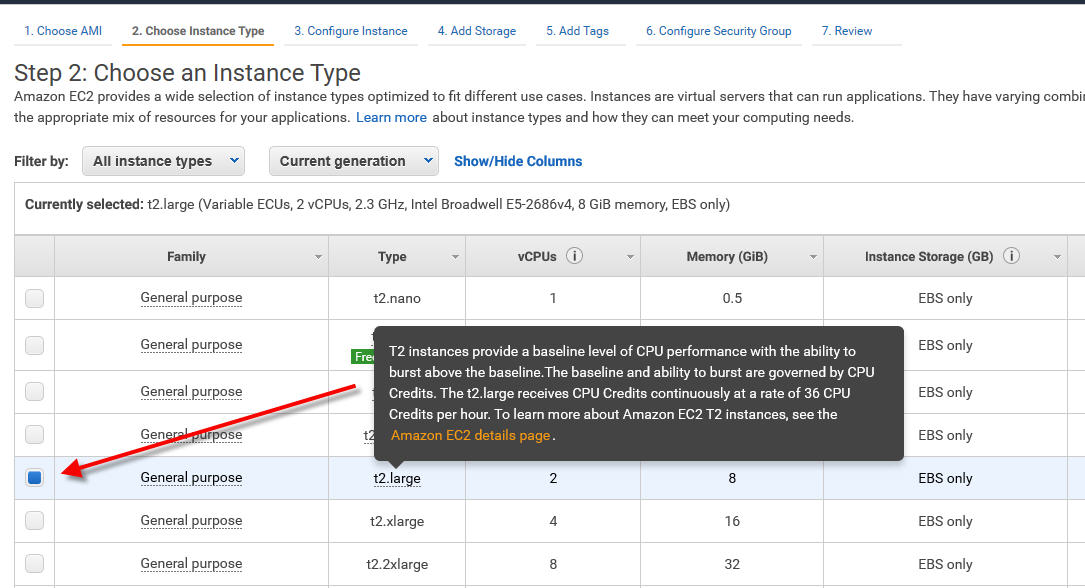
As per Zimbra requirements, select a t2.large:
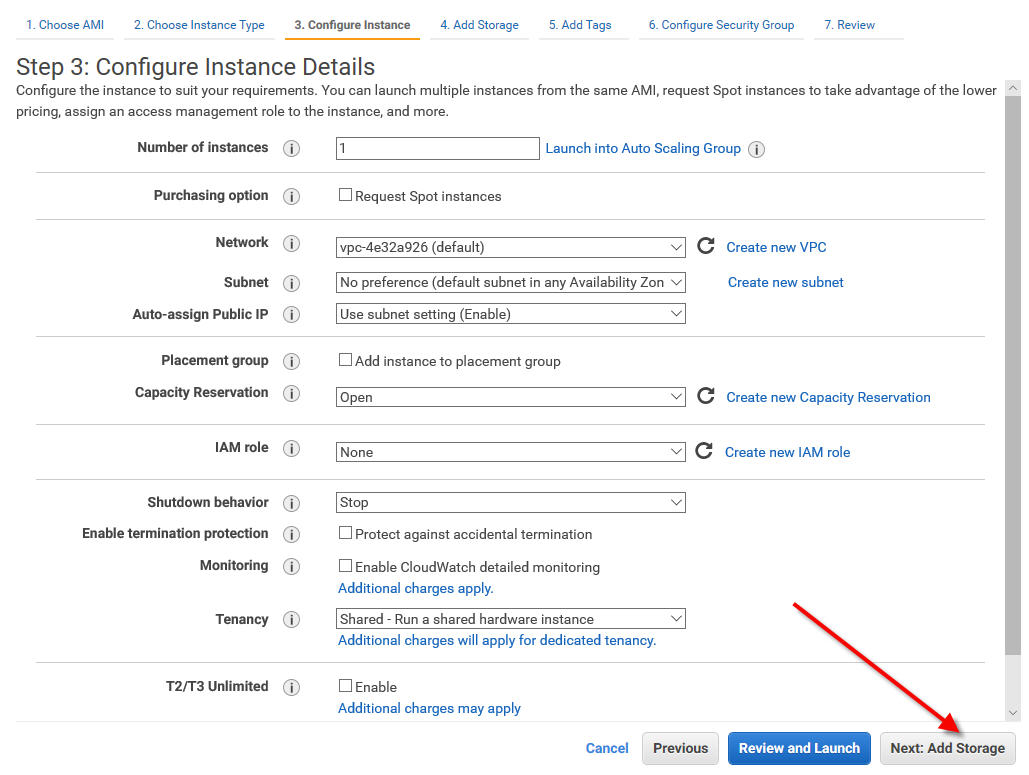
Now "Configure Instance Details":

Accept the defaults or modify below to your environment (for example, set the VPC to one you currently have):
Make Root 10GB and add a second volume for /opt and ensure it is encrypted. It is recommended that you deselect "delete on termination" for your volumes so the volume will still exist if you accidentally delete your instance.
 Add any Tags you wish:

Below are all the ports required for Zimbra in a security group:
Review, launch, and proceed to configuring the server:

Server Configuration
We used Ubuntu 16.04 as that's one of the supported OS's from Zimbra Collaboration 8.8 - Supported Systems.
#hostnamectl set-hostname mail.yourdomain.com

#head -2 /etc/hosts
aws.elastic.ip  mail.yourdomain.com
aws.internal.ip   mail.yourdomain.com

 #fdisk -l

root@mail:/# fdisk /dev/xvdb

Welcome to fdisk (util-linux 2.27.1).
Changes will remain in memory only, until you decide to write them.
Be careful before using the write command.

Device does not contain a recognized partition table.
Created a new DOS disklabel with disk identifier 0x2342af0e.

Command (m for help): p
Disk /dev/xvdb: 20 GiB, 21474836480 bytes, 41943040 sectors
Units: sectors of 1 * 512 = 512 bytes
Sector size (logical/physical): 512 bytes / 512 bytes
I/O size (minimum/optimal): 512 bytes / 512 bytes
Disklabel type: dos
Disk identifier: 0x2342af0e

Command (m for help): n
Partition type
   p   primary (0 primary, 0 extended, 4 free)
   e   extended (container for logical partitions)
Select (default p): p
Partition number (1-4, default 1):
First sector (2048-41943039, default 2048):
Last sector, +sectors or +size{K,M,G,T,P} (2048-41943039, default 41943039):

Created a new partition 1 of type 'Linux' and of size 20 GiB.

Command (m for help): w
The partition table has been altered.
Calling ioctl() to re-read partition table.
Syncing disks.

df -Th
mkfs.ext4 /dev/xvdb
vi /etc/fstab
/dev/xvdb       /opt     ext4   defaults,discard        0 0

mount /opt
Download and Install Zimbra
It is recommended that you always use the latest version. Note: Replace yourdomain.com with your real domain name.
#cd /var/tmp
wget https://files.zimbra.com/downloads/8.8.10_GA/zcs-8.8.10_GA_3039.UBUNTU16_64.20180928094617.tgz
tar -zxvf zcs-8.8.10_GA_3039.UBUNTU16_64.20180928094617.tgz
cd zcs-8.8.10_GA_3039.UBUNTU16_64.20180928094617/
 ./install.sh

Installing:
    zimbra-core
    zimbra-ldap
    zimbra-logger
    zimbra-mta
    zimbra-dnscache
    zimbra-snmp
    zimbra-store
    zimbra-apache
    zimbra-spell
    zimbra-memcached
    zimbra-proxy
    zimbra-drive
    zimbra-patch
    zimbra-chat

The system will be modified.  Continue? [N] Y

Main menu

   1) Common Configuration:
   2) zimbra-ldap:                             Enabled
   3) zimbra-logger:                           Enabled
   4) zimbra-mta:                              Enabled
   5) zimbra-dnscache:                         Enabled
   6) zimbra-snmp:                             Enabled
   7) zimbra-store:                            Enabled
        +Create Admin User:                    yes
        +Admin user to create:                 admin@yourdomain.com
******* +Admin Password                        UNSET
        +Anti-virus quarantine user:           virus-quarantine.lhavz1olhc@yourdomain.com
        +Enable automated spam training:       yes
        +Spam training user:                   spam.tnruuzdb5@yourdomain.com
        +Non-spam(Ham) training user:          ham.pqgvtgkqzy@yourdomain.com
        +SMTP host:                            mail.yourdomain.com
        +Web server HTTP port:                 8080
        +Web server HTTPS port:                8443
        +Web server mode:                      https
        +IMAP server port:                     7143
        +IMAP server SSL port:                 7993
        +POP server port:                      7110
        +POP server SSL port:                  7995
        +Use spell check server:               yes
        +Spell server URL:                     http://mail.yourdomain.com:7780/aspell.php
        +Enable version update checks:         TRUE
        +Enable version update notifications:  TRUE
        +Version update notification email:    admin@yourdomain.com
        +Version update source email:          admin@yourdomain.com
        +Install mailstore (service webapp):   yes
        +Install UI (zimbra,zimbraAdmin webapps): yes

   8) zimbra-spell:                            Enabled
   9) zimbra-proxy:                            Enabled
  10) Default Class of Service Configuration:
   s) Save config to file
   x) Expand menu
   q) Quit

Address unconfigured (**) items  (? - help) 7

Store configuration

   1) Status:                                  Enabled
   2) Create Admin User:                       yes
   3) Admin user to create:                    admin@yourdomain.com
** 4) Admin Password                           UNSET
   5) Anti-virus quarantine user:              virus-quarantine.lhavz1olhc@yourdomain.com
   6) Enable automated spam training:          yes
   7) Spam training user:                      spam.tnruuzdb5@yourdomain.com
   8) Non-spam(Ham) training user:             ham.pqgvtgkqzy@yourdomain.com
   9) SMTP host:                               mail.yourdomain.com
  10) Web server HTTP port:                    8080
  11) Web server HTTPS port:                   8443
  12) Web server mode:                         https
  13) IMAP server port:                        7143
  14) IMAP server SSL port:                    7993
  15) POP server port:                         7110
  16) POP server SSL port:                     7995
  17) Use spell check server:                  yes
  18) Spell server URL:                        http://mail.yourdomain.com:7780/aspell.php
  19) Enable version update checks:            TRUE
  20) Enable version update notifications:     TRUE
  21) Version update notification email:       admin@yourdomain.com
  22) Version update source email:             admin@yourdomain.com
  23) Install mailstore (service webapp):      yes
  24) Install UI (zimbra,zimbraAdmin webapps): yes

Select, or 'r' for previous menu [r] 4

Password for admin@yourdomain.com (min 6 characters): [6CAfR3b_9] *************

Store configuration

   1) Status:                                  Enabled
   2) Create Admin User:                       yes
   3) Admin user to create:                    admin@yourdomain.com
   4) Admin Password                           set
   5) Anti-virus quarantine user:              virus-quarantine.lhavz1olhc@yourdomain.com
   6) Enable automated spam training:          yes
   7) Spam training user:                      spam.tnruuzdb5@yourdomain.com
   8) Non-spam(Ham) training user:             ham.pqgvtgkqzy@yourdomain.com
   9) SMTP host:                               mail.yourdomain.com
  10) Web server HTTP port:                    8080
  11) Web server HTTPS port:                   8443
  12) Web server mode:                         https
  13) IMAP server port:                        7143
  14) IMAP server SSL port:                    7993
  15) POP server port:                         7110
  16) POP server SSL port:                     7995
  17) Use spell check server:                  yes
  18) Spell server URL:                        http://mail.yourdomain.com:7780/aspell.php
  19) Enable version update checks:            TRUE
  20) Enable version update notifications:     TRUE
  21) Version update notification email:       admin@yourdomain.com
  22) Version update source email:             admin@yourdomain.com
  23) Install mailstore (service webapp):      yes
  24) Install UI (zimbra,zimbraAdmin webapps): yes

Select, or 'r' for previous menu [r]

Select, or 'r' for previous menu [r]

Main menu

   1) Common Configuration:
   2) zimbra-ldap:                             Enabled
   3) zimbra-logger:                           Enabled
   4) zimbra-mta:                              Enabled
   5) zimbra-dnscache:                         Enabled
   6) zimbra-snmp:                             Enabled
   7) zimbra-store:                            Enabled
   8) zimbra-spell:                            Enabled
   9) zimbra-proxy:                            Enabled
  10) Default Class of Service Configuration:
   s) Save config to file
   x) Expand menu
   q) Quit

*** CONFIGURATION COMPLETE - press 'a' to apply
Select from menu, or press 'a' to apply config (? - help) a
Save configuration data to a file? [Yes]
Save config in file: [/opt/zimbra/config.24976]
Saving config in /opt/zimbra/config.24976...done.
The system will be modified - continue? [No] yes
Operations logged to /tmp/zmsetup.20181129-174223.log
Setting local config values...
Certificate Using Letsencrypt
We followed the Zimbra instructions for installing a Let's Encrypt SSL Certificate. Ensure you enabled port 80 in your Zimbra Security Group in AWS.
git clone https://github.com/letsencrypt/letsencrypt /opt/letsencrypt

Confirm no applications are listening to port 80: netstat -na | grep ':80.*LISTEN' If any processes are returned, kill them.

#su - zimbra -c "zmcontrol stop"

cd /opt/letsencrypt
./letsencrypt-auto certonly --standalone --email servers@yourdomain.com -d mail.yourdomain.com

Please read the Terms of Service at
https://letsencrypt.org/documents/LE-SA-v1.2-November-15-2017.pdf. You must
agree in order to register with the ACME server at
https://acme-v02.api.letsencrypt.org/directory
- - - - - - - - - - - - - - - - - - - - - - - - - - - - - - - - - - - - - - - -
(A)gree/(C)ancel: A

- - - - - - - - - - - - - - - - - - - - - - - - - - - - - - - - - - - - - - - -
Would you be willing to share your email address with the Electronic Frontier
Foundation, a founding partner of the Let's Encrypt project and the non-profit
organization that develops Certbot? We'd like to send you email about our work
encrypting the web, EFF news, campaigns, and ways to support digital freedom.
- - - - - - - - - - - - - - - - - - - - - - - - - - - - - - - - - - - - - - - -
(Y)es/(N)o: N
Obtaining a new certificate
Performing the following challenges:
http-01 challenge for mail.yourdomain.com
Waiting for verification...
Cleaning up challenges

IMPORTANT NOTES:
 - Congratulations! Your certificate and chain have been saved at:
   /etc/letsencrypt/live/mail.yourdomain.com/fullchain.pem
   Your key file has been saved at:
   /etc/letsencrypt/live/mail.yourdomain.com/privkey.pem
   Your cert will expire on 2019-02-27. To obtain a new or tweaked
   version of this certificate in the future, simply run
   letsencrypt-auto again. To non-interactively renew *all* of your
   certificates, run "letsencrypt-auto renew"
 - Your account credentials have been saved in your Certbot
   configuration directory at /etc/letsencrypt. You should make a
   secure backup of this folder now. This configuration directory will
   also contain certificates and private keys obtained by Certbot so
   making regular backups of this folder is ideal.
 - If you like Certbot, please consider supporting our work by:

   Donating to ISRG / Let's Encrypt:   https://letsencrypt.org/donate
   Donating to EFF:                    https://eff.org/donate-le
Letsencrypt Zimbra with Cerbot
We also followed Cerbot instructions to automate the deployment of letsencrypt certificates to Zimbra:
apt-get install software-properties-common
add-apt-repository ppa:certbot/certbot
apt-get update
apt-get install certbot
Set email="admin@yourdomain.com" and common_names=( "mail.yourdomain.com" ) and backup existing SSL files:
root@mail:/opt/letsencrypt-zimbra# vi letsencrypt-zimbra.cfg
cp -a /opt/zimbra/ssl/zimbra /opt/zimbra/ssl/zimbra.$(date "+%Y%m%d")
Run as Zimbra user:
root@mail:/opt/letsencrypt-zimbra# sudo -Hiu zimbra /opt/letsencrypt-zimbra/obtain-and-deploy-letsencrypt-cert.sh -vf
obtain-and-deploy-letsencrypt-cert.sh: info: Running in force mode, certificate will be renewed.
obtain-and-deploy-letsencrypt-cert.sh: info: create csr config '/tmp/tmp.C8IEfB0eiu/openssl.cnf'
obtain-and-deploy-letsencrypt-cert.sh: info: generate csr '/tmp/tmp.C8IEfB0eiu/request.pem'
obtain-and-deploy-letsencrypt-cert.sh: info: stop nginx
obtain-and-deploy-letsencrypt-cert.sh: info: issue certificate; certbot_extra_args: --non-interactive --agree-tos
Saving debug log to /var/log/letsencrypt/letsencrypt.log
Plugins selected: Authenticator standalone, Installer None
Starting new HTTPS connection (1): acme-v02.api.letsencrypt.org
Performing the following challenges:
http-01 challenge for mail.yourdomain.com
Waiting for verification...
Cleaning up challenges
Server issued certificate; certificate written to /tmp/tmp.C8IEfB0eiu/0000_cert.pem
Cert chain written to 8
Cert chain written to 9

IMPORTANT NOTES:
 - Congratulations! Your certificate and chain have been saved at:
   /tmp/tmp.C8IEfB0eiu/0001_chain.pem
   Your cert will expire on 2019-02-28. To obtain a new or tweaked
   version of this certificate in the future, simply run certbot
   again. To non-interactively renew *all* of your certificates, run
   "certbot renew"
 - If you like Certbot, please consider supporting our work by:

   Donating to ISRG / Let's Encrypt:   https://letsencrypt.org/donate
   Donating to EFF:                    https://eff.org/donate-le

obtain-and-deploy-letsencrypt-cert.sh: info: start nginx
obtain-and-deploy-letsencrypt-cert.sh: info: assemble cert files
obtain-and-deploy-letsencrypt-cert.sh: info: test and deploy certificates
obtain-and-deploy-letsencrypt-cert.sh: info: restart zimbra
obtain-and-deploy-letsencrypt-cert.sh: info: cleanup temp files
Miscellaneous Configuration
Zimbra has built-in monitoring of disk space. Ubuntu comes with a package management tool called Snap, which was Canonical's new package management tool and it creates Squashfs "loop" mounted filesystems which are displayed as 100% full with a df commend. You either have to uninstall snapd or just disable loop mounts from being checked. Amazon also uses snapd, so we opted to disable them from being checked. So, as the Zimbra user:
zmlocalconfig -e zmstat_df_excludes="/mount/point:/mount/point2"

zimbra@mail:~$ zmlocalconfig -e zmstat_df_excludes="/snap/core/5897:/snap/amazon-ssm-agent/495:/snap/amazon-ssm-agent/930:/snap/core/5328"
$ zmstatctl restart
If you don't want to accept webmail over HTTP, Redirect http -> https :
su - zimbra
zmprov ms `zmhostname` zimbraReverseProxyMailMode redirect
Our mail server is in a different domain than the email domain we are using. Headers: /opt/zimbra/conf/amavisd.conf.in:
$myhostname = 'mail.youremaildomain.com';We also had to set localhost in /etc/hosts as 127.0.0.1 mail.youremaildomain.com localhost. Then run:
su - zimbra
postconf -e smtpd_banner="mail.youremaildomain.com NO UCE ESMTP"
zmprov mcf zimbraMtaMyHostname mail.youremaildomain.com
If you are migrating email from another server, you can use imapsync to copy mail from it to your new Zimbra.
https://www.vultr.com/docs/how-to-migrate-mailboxes-easily-with-imapsync-on-ubuntu-16-04-lts
http://imapsync.lamiral.info/INSTALL.d/INSTALL.Ubuntu.txt
imapsync --host1 mail.oldserver.com --user1 someuser@oldserver.com --password1 THEIRPASSWORD --host2 mail.newzimbra.com --user2 someuser@yourdomain.com --password2 PASSWORDOFTHEIRSONNEWSERVERConnect to Your Server
See Zimbra Administration Console on how to login to administer your server.
Webmail via: https://mail.yourdomain.com/
You can also use Zimbra Desktop for integration that works but feels a bit dated. You can tie in any other IMAP app, which we will discuss in an upcoming blog post. Read Part III of our series to learn how to connect your Zimbra mailbox and calendar to Thunderbird and how to connect both to your mobile device.